
NestGrow — Sistema IoT open source per culle di accrescimento vegetale
🇮🇹 Italiano
🌱 Introduzione
NestGrow è un sistema IoT open source per la gestione automatizzata di culle di accrescimento vegetale — fioriere intelligenti dotate di sensori di umidità, pompe di irrigazione e comunicazione WiFi.
Il progetto nasce dall’esigenza di portare precision farming su scala ridotta, a costo contenuto, con hardware reperibile ovunque e software completamente aperto.
Il firmware gira su ESP32 WROOM-32D, si configura dal browser senza toccare il codice, comunica via MQTT con un backend Docker e consente l’irrigazione automatica con soglie configurabili zona per zona — in tempo reale, dalla dashboard web.
🧩 Architettura del sistema
ESP32 WROOM-32D │ ├── 4× Sensore umidità capacitivo (ADC1) ├── 1× Galleggiante serbatoio (GPIO 36) ├── 4× Relè → Pompe/Elettrovalvole └── WiFi → MQTT → Docker backend │ ├── FastAPI + MariaDB ├── Dashboard Vue 3 └── License Server lake8.devLa culla è l’unità base del sistema. Ogni culla ha 4 zone indipendenti, ognuna con il proprio sensore di umidità, la propria pompa e le proprie soglie di irrigazione configurabili.
Il backend Docker (closed source) gestisce la logica di irrigazione, i grafici storici, la messaggistica e il sistema di licenze. Il firmware ESP32 è completamente open source sotto licenza MIT.
🔌 Componenti hardware
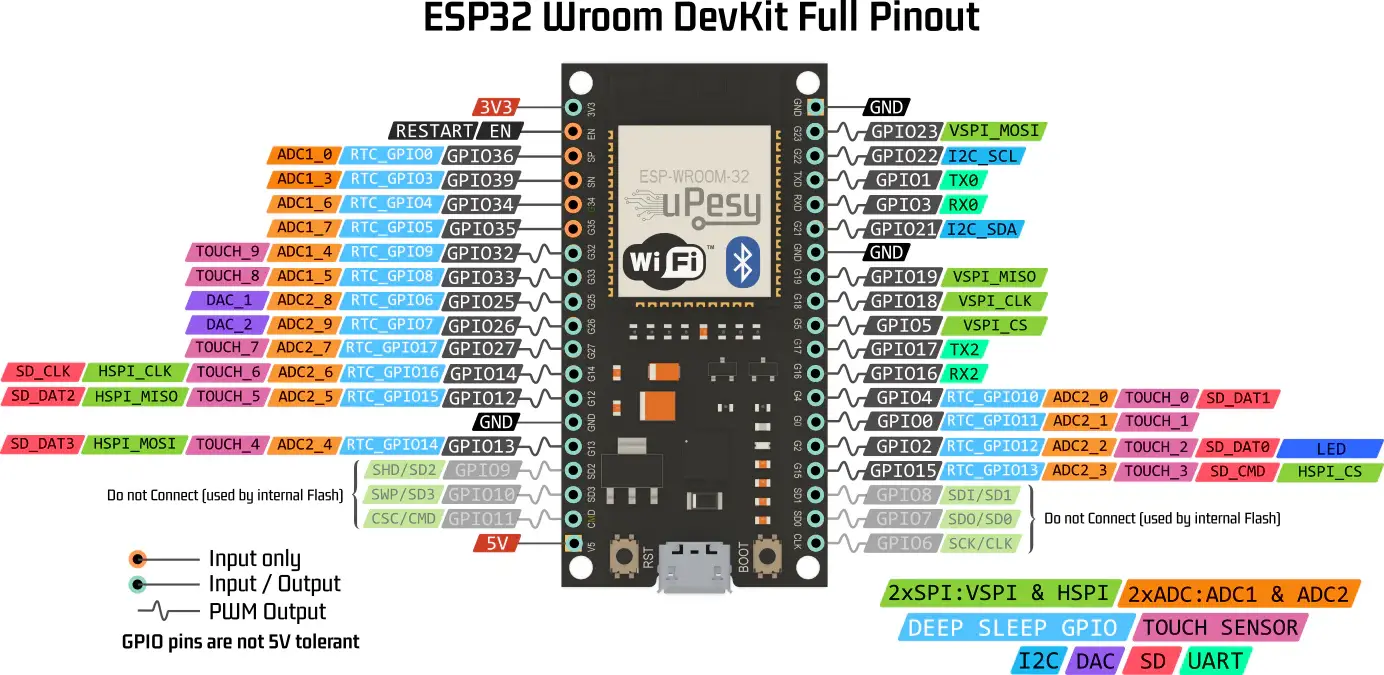
 ESP32 WROOM-32D DevKit V1 — il cuore del sistema
| Componente | Modello | Quantità |
|---|---|---|
| Microcontrollore | ESP32 WROOM-32D DevKit | 1 |
| Sensori umidità | Capacitive Soil Moisture V2.0 | 4 |
| Modulo relè | HW-316 4 canali | 1 |
| Galleggiante serbatoio | Float switch | 1 |
| Pompe | Peristaltiche 3V DC | 4 |
| Alimentatore logica | USB 5V 2A | 1 |
| Alimentatore pompe | 2× batterie AA o alimentatore 3V | 1 |
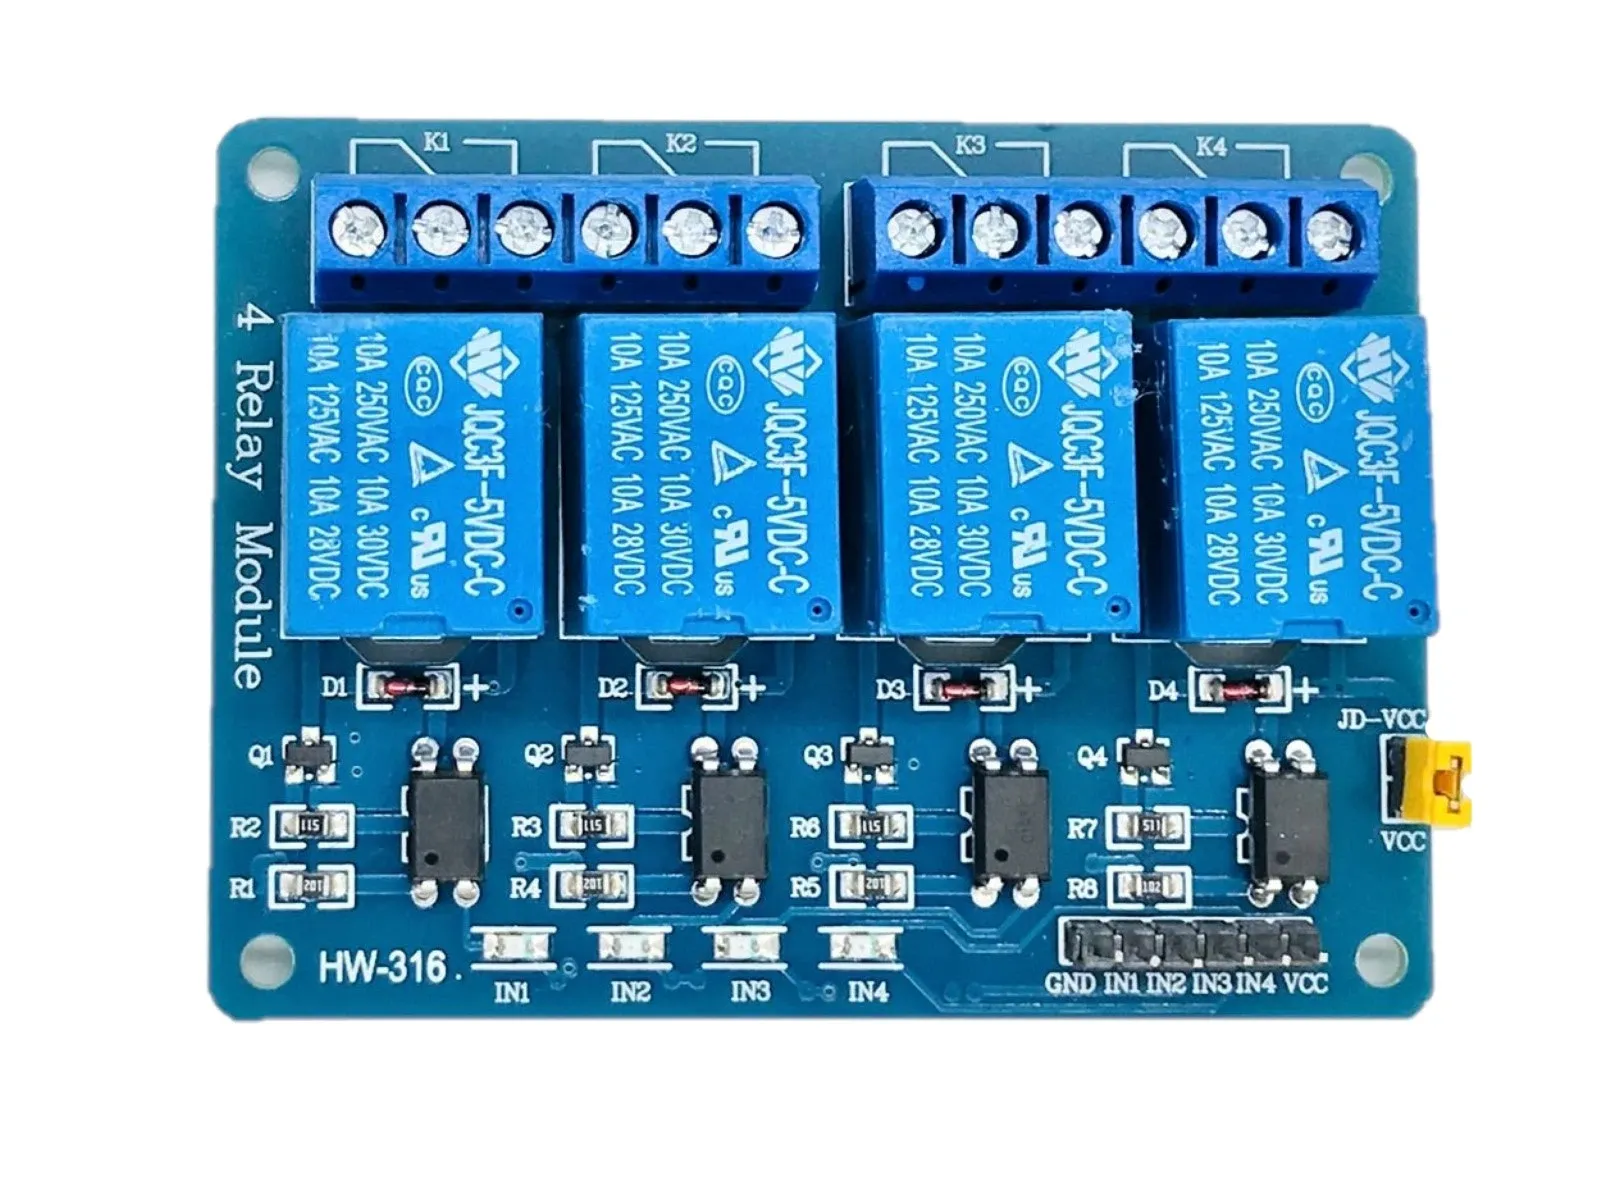 Modulo relè HW-316 — 4 canali, logica inversa (LOW = ON)
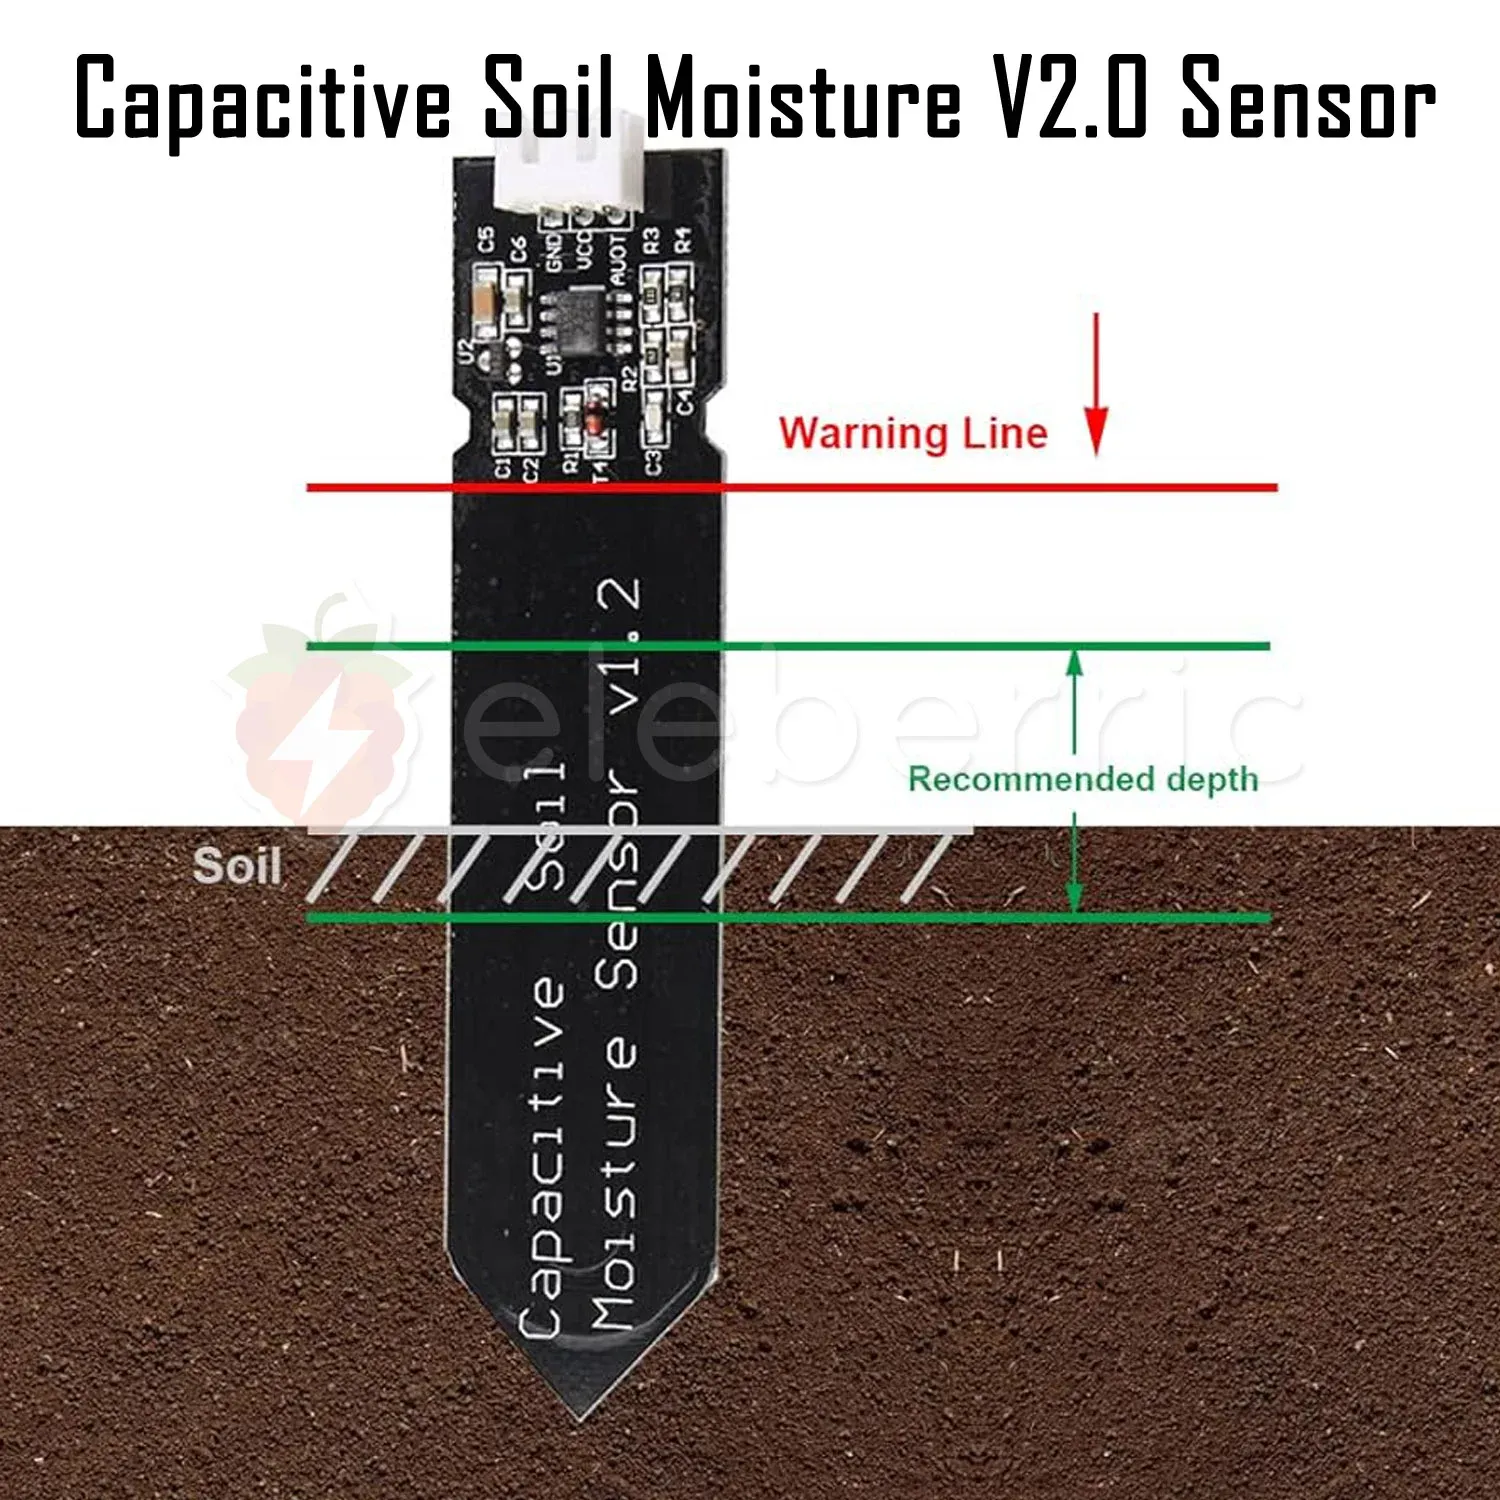 Sensore umidità capacitivo V2.0 — nessuna corrosione, lunga durata
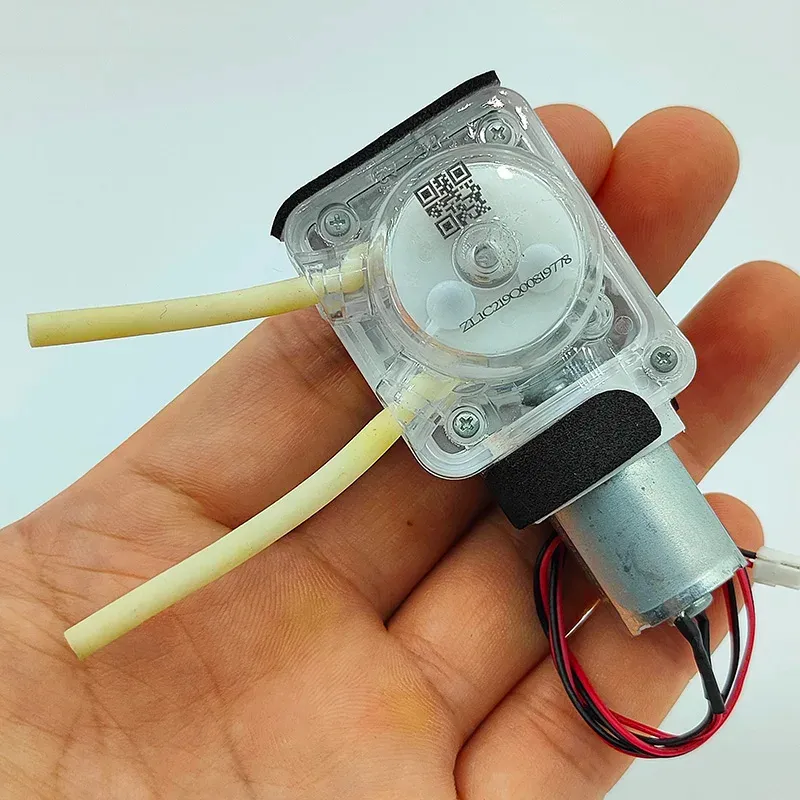 Pompe peristaltiche 3V DC — silenziose, autoaspiranti
📐 Schema di collegamento
Alimentatore 5V 2A├── 5V → ESP32 (USB-C)├── 5V → Relè JD-VCC (bobine)└── GND comune
ESP32 WROOM-32D├── GPIO 25 → IN0 relè → Pompa zona 1├── GPIO 26 → IN1 relè → Pompa zona 2├── GPIO 27 → IN2 relè → Pompa zona 3├── GPIO 14 → IN3 relè → Pompa zona 4├── GPIO 32 → AOUT sensore umidità zona 1 (ADC1)├── GPIO 33 → AOUT sensore umidità zona 2 (ADC1)├── GPIO 34 → AOUT sensore umidità zona 3 (ADC1)├── GPIO 35 → AOUT sensore umidità zona 4 (ADC1)├── GPIO 36 → Galleggiante serbatoio (INPUT, pullup 10kΩ)├── 3.3V   → VCC tutti i sensori umidità├── 3.3V   → VCC relè (logica)└── GND    → GND comune
Batterie AA (3V)├── + → COM relè (NO1-4)└── - → GND pompe
⚠️ Importante: usare esclusivamente GPIO ADC1 (GPIO 32-35, 36) per i sensori. ADC2 non è utilizzabile quando il WiFi è attivo.
⚠️ Jumper JD-VCC: rimuovere il jumper dal modulo HW-316 per separare l’alimentazione delle bobine (5V) dalla logica ESP32 (3.3V).
💡 Funzionalità firmware
Captive portal — configurazione da browser
Al primo avvio (o dopo un reset), l’ESP32 entra in AP mode e crea una rete WiFi:
SSID: NestGrow-Setup-XXXXConnettendosi con qualsiasi dispositivo e aprendo 192.168.4.1, si accede a una pagina di configurazione che permette di impostare:
- SSID e password della rete WiFi
- IP DHCP o statico
- Hostname del broker MQTT
- Nome dispositivo
La configurazione viene salvata in NVS (flash permanente) e sopravvive ai riavvii.
Topic MQTT
| Topic | Direzione | Payload |
|---|---|---|
nestgrow/{id}/zona/{1-4}/umidita | ESP32 → Broker | {"v": 67.3, "ts": 1234567890} |
nestgrow/{id}/serbatoio/livello | ESP32 → Broker | {"v": 100.0, "ts": 1234567890} |
nestgrow/{id}/heartbeat | ESP32 → Broker | {"uptime_sec": 3600, "wifi_rssi": -65, ...} |
nestgrow/{id}/zona/{1-4}/pompa | Broker → ESP32 | {"cmd": "on", "sec": 30} |
nestgrow/{id}/cmd/config | Broker → ESP32 | {"zona": 1, "intervallo_ms": 15000} |
nestgrow/{id}/cmd/reconfig | Broker → ESP32 | {"ssid": "...", "mqtt_host": "..."} |
Intervallo lettura configurabile per zona
Ogni zona può avere un intervallo di lettura diverso, configurabile in tempo reale dal backend senza riflashare:
{ "zona": 1, "intervallo_ms": 10000, "salva_nvs": true}Il valore viene salvato in NVS e sopravvive al riavvio.
Safety hardware
- Timeout pompa: 5 minuti massimi per ciclo, indipendente dal backend
- Blocco serbatoio: se il galleggiante segnala “vuoto”, tutte le pompe vengono bloccate
- Riconnessione automatica: WiFi e MQTT si riconnettono automaticamente in caso di caduta
🧠 Estratti di codice
Lettura umidità con media mobile anti-rumore
float sensors_read_soil(int zone) {#ifdef DEBUG_SENSORS    return (float)(30 + random(0, 50));#endif    const int PIN[4] = {SOIL_1, SOIL_2, SOIL_3, SOIL_4};
    // Media mobile su 5 campioni per eliminare rumore ADC    long sum = 0;    for (int i = 0; i < 5; i++) {        sum += analogRead(PIN[zone]);        delay(10);    }    int raw = sum / 5;
    // Conversione raw → percentuale (calibrazione in config.h)    float pct = map(raw, SOIL_DRY, SOIL_WET, 0, 100);    return constrain(pct, 0.0f, 100.0f);}
Galleggiante serbatoio — logica corretta
float sensors_read_float() {#ifdef DEBUG_SENSORS return 100.0f;#endif // LOW = galleggiante abbassato = serbatoio PIENO // HIGH = galleggiante alzato = serbatoio VUOTO return (digitalRead(FLOAT_SW) == LOW) ? 100.0f : 0.0f;}Controllo relè con logica inversa HW-316
void valves_open(int zone, int seconds) {    if (zone < 1 || zone > 4) return;
    int pin = RELAY_PINS[zone - 1];
    // HW-316: LOW = relè chiuso = pompa ON    digitalWrite(pin, LOW);
    open_time[zone - 1] = millis();    open_duration[zone - 1] = (unsigned long)seconds * 1000UL;
    Serial.printf("[VALVE] Zona %d ON per %ds\n", zone, seconds);}
void valves_close(int zone) {    if (zone < 1 || zone > 4) return;
    // HW-316: HIGH = relè aperto = pompa OFF    digitalWrite(RELAY_PINS[zone - 1], HIGH);    open_time[zone - 1] = 0;
    Serial.printf("[VALVE] Zona %d OFF\n", zone);}
NTP — sincronizzazione orario
void syncNTP() {    // UTC+1 Italia, +3600 ora legale    configTime(3600, 3600, "pool.ntp.org", "time.nist.gov");
    struct tm timeinfo;    int retry = 0;    while (!getLocalTime(&timeinfo) && retry < 20) {        delay(500);        retry++;    }
    if (retry < 20) {        char buf[32];        strftime(buf, sizeof(buf), "%Y-%m-%dT%H:%M:%S", &timeinfo);        Serial.printf("[NTP] Sincronizzato: %s\n", buf);    }}
🛠️ Setup e compilazione
Requisiti
- VS Code + estensione PlatformIO IDE
- Driver CP2102 (incluso in Windows 10/11) o CH340
- Git for Windows
platformio.ini
[env:esp32dev]platform = espressif32@5.3.0board = esp32devframework = arduinomonitor_speed = 115200upload_port = COM3upload_speed = 921600
lib_deps =  knolleary/PubSubClient @ ^2.8  bblanchon/ArduinoJson @ ^7.0  esphome/ESPAsyncWebServer-esphome @ ^3.1.0  esphome/AsyncTCP-esphome @ ^2.1.0
Primo flash
# Clona il repositorygit clone https://github.com/jaffa2970/nestgrow-esp32cd nestgrow-esp32
# Apri in VS Codecode .
# Compila e flasha (PlatformIO → Upload)# oppure da terminale PlatformIO:pio run --target upload --upload-port COM3
Calibrazione sensori umidità
In src/config.h modifica i valori di calibrazione:
// Valori raw ADC — misura con sensore in aria e in acqua#define SOIL_DRY 2800 // sensore in aria (0% umidità)#define SOIL_WET 1200 // sensore in acqua (100% umidità)Reset configurazione
# Via Serial Monitor (115200 baud)# Scrivi il comando e premi Invio:RESET
# oppure via MQTT (se connesso):mosquitto_pub -h localhost -t "nestgrow/{device_id}/cmd/reset" -m '{}'
🗺️ Roadmap — Feature future
NestGrow è un progetto vivo. Le feature qui sotto sono pianificate per le prossime versioni del firmware e del backend Docker.
💡 Sensore di luce + gestione lampade UV
Le piante in ambienti interni necessitano di illuminazione artificiale calibrata. La prossima versione integrerà un sensore di luminosità (es. BH1750 o TSL2561 via I2C) per misurare il livello di lux in tempo reale.
Il backend gestirà un programma di illuminazione configurabile per culla — orario di accensione, spegnimento e intensità — con la possibilità di attivare o disattivare le lampade UV in modo automatico in base alla lettura del sensore oppure seguendo un ciclo circadiano personalizzato.
Hardware previsto:
- Sensore luce: BH1750 (I2C, GPIO 21/22)
- Relè aggiuntivo: canale 5 del modulo (o secondo modulo HW-316)
- Lampade: strip LED UV 12V o lampade a crescita
Topic MQTT previsti:
nestgrow/{id}/luce/livello → {"lux": 4500, "ts": ...}nestgrow/{id}/luce/lampada ← {"cmd": "on"} / {"cmd": "off"}nestgrow/{id}/cmd/luce-config ← {"on": "06:00", "off": "20:00", "auto": true}🧪 Sensore pH — gestione chimica del terreno
Il pH del terreno è determinante per l’assorbimento dei nutrienti. Una valore fuori range (idealmente 6.0–7.0 per la maggior parte delle colture) può rendere inutile qualsiasi irrigazione.
La roadmap prevede l’integrazione di un sensore pH analogico (es. modulo con sonda SEN0161) collegato ad ADC1 dell’ESP32. Il backend calcolerà una media mobile nel tempo, avviserà l’utente quando il pH esce dall’intervallo configurato e registrerà lo storico per l’analisi delle tendenze.
Hardware previsto:
- Sensore: SEN0161 o modulo pH con uscita analogica 0-3.3V
- Pin: GPIO libero su ADC1 (es. GPIO 39)
- Calibrazione: soluzione tampone pH 4.0 e pH 7.0
Integrazione dashboard:
- Grafico storico pH per zona
- Alert automatico via messaggistica lake8.dev se pH fuori range
- Suggerimento correttivo (acidificante/basificante)
📷 Telecamera per culla — monitoraggio visivo
Per chi vuole vedere le proprie piante in tempo reale senza essere fisicamente presente, NestGrow integrerà una ESP32-CAM dedicata per ogni culla.
La board ESP32-CAM (3-5€) include una camera OV2640 collegata tramite flat cable FPC estendibile — la board si nasconde nel contenitore elettrico mentre la piccola camera (20×20mm) viene posizionata puntata sulle piante nella direzione desiderata.
Lo stream video viene pubblicato via HTTP MJPEG e il backend Docker lo rende disponibile nella dashboard, con un tab dedicato per ogni culla. È possibile scattare snapshot programmati e tenerli come storico visivo della crescita.
Hardware previsto:
- Board: ESP32-CAM con OV2640
- Cavo FPC: 15-30cm per separare camera da board
- Firmware: repository separato
lake8dev/nestgrow-cam(open source MIT)
Topic MQTT previsti:
nestgrow/{id}/cam/snapshot ← {"cmd": "capture"}nestgrow/{id}/cam/stato → {"streaming": true, "url": "http://..."}Feature dashboard:
- Tab “Camera” per ogni culla con stream live
- Pulsante “Scatta foto” con download diretto
- Timelapse automatico giornaliero (uno snapshot ogni N ore)
- Confronto visivo crescita nel tempo
💬 Contribuisci: se vuoi proporre o sviluppare una di queste feature, apri una Issue o una Pull Request su github.com/jaffa2970/nestgrow-esp32. Il firmware è MIT — ogni contributo è benvenuto.
🔗 Repository e risorse
- GitHub firmware (open source MIT): github.com/jaffa2970/nestgrow-esp32
- lake8.dev: lake8.dev
🇬🇧 English Version
🌱 Introduction
NestGrow is an open-source IoT system for the automated management of vegetable growing cells — smart planter boxes equipped with moisture sensors, irrigation pumps, and WiFi connectivity.
The project was born from the need to bring precision farming to a small scale, at low cost, with hardware available anywhere and fully open software.
The firmware runs on an ESP32 WROOM-32D, configures itself from the browser without touching the code, communicates via MQTT with a Docker backend, and enables automatic irrigation with per-zone configurable thresholds — in real time, from the web dashboard.
🧩 System Architecture
ESP32 WROOM-32D │ ├── 4× Capacitive moisture sensor (ADC1) ├── 1× Tank float switch (GPIO 36) ├── 4× Relay → Pumps/Solenoid valves └── WiFi → MQTT → Docker backend │ ├── FastAPI + MariaDB ├── Vue 3 Dashboard └── lake8.dev License ServerThe growing cell is the basic unit of the system. Each cell has 4 independent zones, each with its own moisture sensor, pump, and configurable irrigation thresholds.
The Docker backend (closed source) handles the irrigation logic, historical graphs, messaging, and license management. The ESP32 firmware is fully open source under the MIT license.
🔌 Hardware Components
| Component | Model | Qty |
|---|---|---|
| Microcontroller | ESP32 WROOM-32D DevKit | 1 |
| Moisture sensors | Capacitive Soil Moisture V2.0 | 4 |
| Relay module | HW-316 4-channel | 1 |
| Tank level sensor | Float switch | 1 |
| Pumps | 3V DC peristaltic | 4 |
| Logic power supply | USB 5V 2A | 1 |
| Pump power supply | 2× AA batteries or 3V adapter | 1 |
📐 Wiring Diagram
5V 2A Power Supply├── 5V → ESP32 (USB-C)├── 5V → Relay JD-VCC (coils)└── Common GND
ESP32 WROOM-32D├── GPIO 25 → IN0 relay → Pump zone 1├── GPIO 26 → IN1 relay → Pump zone 2├── GPIO 27 → IN2 relay → Pump zone 3├── GPIO 14 → IN3 relay → Pump zone 4├── GPIO 32 → AOUT moisture sensor zone 1 (ADC1)├── GPIO 33 → AOUT moisture sensor zone 2 (ADC1)├── GPIO 34 → AOUT moisture sensor zone 3 (ADC1)├── GPIO 35 → AOUT moisture sensor zone 4 (ADC1)├── GPIO 36 → Tank float switch (INPUT, 10kΩ pullup)├── 3.3V   → VCC all moisture sensors├── 3.3V   → VCC relay logic└── GND    → Common GND
AA Batteries (3V)├── + → Relay COM (NO1-4)└── - → Pump GND
⚠️ Important: use only ADC1 GPIOs (32-35, 36) for sensors. ADC2 is not available when WiFi is active.
⚠️ JD-VCC jumper: remove the jumper from the HW-316 module to separate coil power (5V) from ESP32 logic (3.3V).
💡 Firmware Features
Captive portal — browser-based setup
On first boot (or after reset), the ESP32 enters AP mode and broadcasts a WiFi network:
SSID: NestGrow-Setup-XXXXConnect with any device and open 192.168.4.1 to access the setup page where you can configure:
- WiFi SSID and password
- DHCP or static IP
- MQTT broker hostname
- Device name
The configuration is saved to NVS (permanent flash storage) and persists across reboots.
MQTT Topics
| Topic | Direction | Payload |
|---|---|---|
nestgrow/{id}/zona/{1-4}/umidita | ESP32 → Broker | {"v": 67.3, "ts": 1234567890} |
nestgrow/{id}/serbatoio/livello | ESP32 → Broker | {"v": 100.0, "ts": 1234567890} |
nestgrow/{id}/heartbeat | ESP32 → Broker | {"uptime_sec": 3600, "wifi_rssi": -65, ...} |
nestgrow/{id}/zona/{1-4}/pompa | Broker → ESP32 | {"cmd": "on", "sec": 30} |
nestgrow/{id}/cmd/config | Broker → ESP32 | {"zona": 1, "intervallo_ms": 15000} |
nestgrow/{id}/cmd/reconfig | Broker → ESP32 | {"ssid": "...", "mqtt_host": "..."} |
Per-zone configurable read interval
Each zone can have a different read interval, configurable in real time from the backend — no reflashing required:
{ "zona": 1, "intervallo_ms": 10000, "salva_nvs": true}The value is saved to NVS and persists across reboots.
Hardware safety
- Pump timeout: 5 minutes maximum per cycle, independent of the backend
- Tank lock: if the float switch signals “empty”, all pumps are blocked
- Auto-reconnect: WiFi and MQTT reconnect automatically on connection loss
🧠 Code Highlights
Moisture reading with anti-noise moving average
float sensors_read_soil(int zone) {#ifdef DEBUG_SENSORS    return (float)(30 + random(0, 50));#endif    const int PIN[4] = {SOIL_1, SOIL_2, SOIL_3, SOIL_4};
    // 5-sample moving average to eliminate ADC noise    long sum = 0;    for (int i = 0; i < 5; i++) {        sum += analogRead(PIN[zone]);        delay(10);    }    int raw = sum / 5;
    // Raw → percentage conversion (calibration in config.h)    float pct = map(raw, SOIL_DRY, SOIL_WET, 0, 100);    return constrain(pct, 0.0f, 100.0f);}
HW-316 relay control with inverted logic
void valves_open(int zone, int seconds) {    // HW-316: LOW = relay closed = pump ON    digitalWrite(RELAY_PINS[zone - 1], LOW);    open_time[zone - 1] = millis();    open_duration[zone - 1] = (unsigned long)seconds * 1000UL;}
void valves_close(int zone) {    // HW-316: HIGH = relay open = pump OFF    digitalWrite(RELAY_PINS[zone - 1], HIGH);    open_time[zone - 1] = 0;}
🛠️ Setup & Build
Requirements
- VS Code + PlatformIO IDE extension
- CP2102 driver (included in Windows 10/11) or CH340
- Git for Windows
platformio.ini
[env:esp32dev]platform = espressif32@5.3.0board = esp32devframework = arduinomonitor_speed = 115200upload_port = COM3upload_speed = 921600
lib_deps =  knolleary/PubSubClient @ ^2.8  bblanchon/ArduinoJson @ ^7.0  esphome/ESPAsyncWebServer-esphome @ ^3.1.0  esphome/AsyncTCP-esphome @ ^2.1.0
First flash
git clone https://github.com/jaffa2970/nestgrow-esp32cd nestgrow-esp32code .
# Build and upload via PlatformIO button# or via PlatformIO terminal:pio run --target upload --upload-port COM3
Sensor calibration
In src/config.h:
// Raw ADC values — measure with sensor in air and in water#define SOIL_DRY 2800 // sensor in air (0% moisture)#define SOIL_WET 1200 // sensor in water (100% moisture)🗺️ Roadmap — Upcoming Features
NestGrow is a living project. The features below are planned for upcoming firmware and Docker backend versions.
💡 Light sensor + UV lamp management
Plants in indoor environments need calibrated artificial lighting. The next version will integrate a light sensor (e.g. BH1750 or TSL2561 via I2C) to measure lux levels in real time.
The backend will manage a configurable lighting schedule per cell — on/off time and intensity — with the ability to automatically control UV lamps based on sensor readings or a custom circadian cycle.
Planned hardware:
- Light sensor: BH1750 (I2C, GPIO 21/22)
- Additional relay: channel 5 (or second HW-316 module)
- Lamps: UV LED strips 12V or grow lights
Planned MQTT topics:
nestgrow/{id}/luce/livello → {"lux": 4500, "ts": ...}nestgrow/{id}/luce/lampada ← {"cmd": "on"} / {"cmd": "off"}nestgrow/{id}/cmd/luce-config ← {"on": "06:00", "off": "20:00", "auto": true}🧪 pH sensor — soil chemistry management
Soil pH is critical for nutrient absorption. A value out of range (ideally 6.0–7.0 for most crops) can make any irrigation ineffective.
The roadmap includes integration of an analog pH sensor (e.g. SEN0161 module) connected to ADC1 on the ESP32. The backend will calculate a moving average over time, alert the user when pH goes out of the configured range, and log historical data for trend analysis.
Planned hardware:
- Sensor: SEN0161 or pH module with 0-3.3V analog output
- Pin: free ADC1 GPIO (e.g. GPIO 39)
- Calibration: pH 4.0 and pH 7.0 buffer solutions
Dashboard integration:
- Historical pH chart per zone
- Automatic alert via lake8.dev messaging if pH out of range
- Corrective suggestion (acidifier/alkalizer)
📷 Per-cell camera — visual monitoring
For those who want to see their plants in real time without being physically present, NestGrow will integrate a dedicated ESP32-CAM for each growing cell.
The ESP32-CAM board (€3–5) includes an OV2640 camera connected via an extendable FPC flat cable — the board hides inside the electrical enclosure while the tiny camera (20×20mm) can be positioned to point at the plants from any angle.
The video stream is published via HTTP MJPEG and the Docker backend makes it available in the dashboard, with a dedicated tab per cell. Scheduled snapshots can be taken and kept as a visual growth log.
Planned hardware:
- Board: ESP32-CAM with OV2640
- FPC cable: 15–30cm to separate camera from board
- Firmware: separate repository
lake8dev/nestgrow-cam(MIT open source)
Planned MQTT topics:
nestgrow/{id}/cam/snapshot ← {"cmd": "capture"}nestgrow/{id}/cam/stato → {"streaming": true, "url": "http://..."}Dashboard features:
- “Camera” tab per cell with live stream
- “Take photo” button with direct download
- Automatic daily timelapse (one snapshot every N hours)
- Visual growth comparison over time
💬 Contribute: if you want to propose or develop one of these features, open an Issue or Pull Request on github.com/jaffa2970/nestgrow-esp32. The firmware is MIT — every contribution is welcome.
🔗 Repository & Links
- GitHub firmware (MIT open source): github.com/jaffa2970/nestgrow-esp32
- lake8.dev: lake8.dev
NestGrow is a lake8.dev project — 2026
← Back to projects